Thursday, December 7, 2017

Electrical Charging System Regrade

Electrical Charging System Regrade, why?

A few reasons have led to this upgrade of the electrical charging systems.
When parked at home the van is up the side of the house, as such there is a very limited amount of sun hitting the solar panel, not enough to keep the twin leisure batteries in any state of decent charge.
In addition the vans engine battery suffers when not used for a couple of weeks.
We decided to fit a smart battery charger powered by a mains hook up, this charges the engine battery directly, which once up to voltage then trips through the Ring Battery to Battery Charger and then subsequently charges up the twin leisure batteries.  If only we had an ideal world!
The Ring B2B charger has a combined Solar Panel input, for some reason the unit seemed to still struggle to keep any decent level of charge in the twin leisure batteries.  The decision was made to split the pair of batteries into two singles which are connected together by a VSR when the voltage in the primary battery reaches a charged state.  This seemed to improve the charging of the leisure batteries, but, however, there was still issues, the charge state of the leisure batteries seemed to be up one day and then down low a following day.  After a few weeks investigating, I felt the problems were being caused by the Ring B2B charger unit. 

Back to basics!

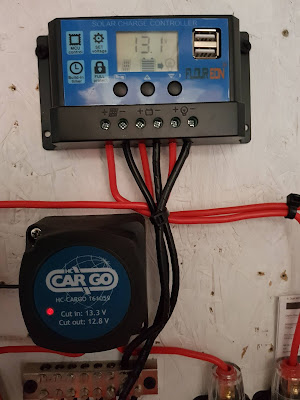
Remove the Ring B2B charge unit.  Instead now fitting a VSR from the engine battery to the first leisure battery, which will click in when the engine battery is in a suitable state of charging.  In addition, we fitted a stand alone Solar Charger.

So far, so good, all initial signs and charge state of the batteries all seem to be good and holding up as I would expect them to do.

As it happens this was the second Ring B2B charger we have used on this van, the first one blew a component and the manufacturer replaced it for us.  However the second one seems to be suffering from a known firmware issue, it fails to switch back to solar when the engine battery drops down, once this happens the leisure batteries are not getting any charge.  The cure for the is is a re-boot of the Ring B2B unit, but this only seems to last a few days at best before the solar charging fails again.  Enough is enough, I will now be fighting to get some of our money back in trying to return the second faulty Ring B2B unit.


Tuesday, November 7, 2017

Spot us from the Air

Just a quick blog entry,
With so many Motorhomes going missing or stolen, we decided to try and make it less desirable and a lot easier to spot from the air in case our vans goes away without us.

We simply painted the registration number on the van roof in Black Hammerite paint.

Tuesday, October 10, 2017

New Wheels & Tyres

For a while now we have been considering new Alloy Wheels with some All Terrain or Mud Terrain tyres to help give an edge when on slippery grass fields or in mud as we quite often find ourselves.
With Gary retiring from full time work and drawing his pension we dug deep in our pockets and decided to buy some alloy wheels and decent tyres at last.

We found these Motorhome Commercial load rated wheels on Ebay, they are from a company called Wheels Direct, it was a pleasure to deal with Gary (the owner) direct and he included a nice set of locking wheel nuts free because we opted to deal with him direct on Tel. 07854 911679

Its worth a mention at this point that after much reading on many forums for the Citroen Relay, Fiat Ducato that we decided to go up a wheel size from 15" wheels to 16" wheels.  Most advice is the bigger wheels improve handling and bring the speedo variation into more or less a true reading, dependant on the choice of tyres.

Tyres??  There are more tyres out there than you can shake a stick at!


After much thought a deliberation, we opted for some serious Mud Terrain tyres.  We chose to go with Kumho Road Venture MT51 tyres, load rated to 112/115 to accommodate the weight of the van being loaded after its completed build and conversion into a motorhome.


Whilst changing the wheels, it had to be done, we painted the brake callipers as they are now clearly visible after fitting the new alloy wheels.


Were well pleased with the end result, the wheels and tyres look great, hopefully they will achieve the ultimate end goal in giving us an edge in slippery conditions in the future.


Monday, October 9, 2017

Heating Upgrade

The Propex Compact 1600 LPG Gas heater just didn't seem to come up to the mark for us, it was a 2KW output which in our LWB van seemed to take ages to warm up, plus we found once up to temperature the thermostat didn't seem to be able to control the heater to maintain temperature and just kept clicking on and off as it pleased.  This lent towards a new thermostat which was around £35 from Propex, now here is the dilemma...
Do we spend £35 on a new thermostat? or do we go ahead and buy a new Chinese Diesel heater at £100?
We opted for a new 5KW diesel heater which cost us with a voucher £90 from Ebay.
We will sell the Propex later on Ebay to hopefully recoup the cost of the new heater.


This heater came with all the kit needed to carry out the fit with no problems.

Luckily, I had the foresight when building the van to allow myself access to the heater in case of repair.
Removal of the Propex was straight forward and didn't take long at all.


A pretty straight forward swap from the Propex to the new diesel heater.

The main issue was deciding how to provide fuel for the new diesel heater, do we us the new 10 Ltr tank that came with the heater, or do I opt to tap the main van fuel tank with a direct feed?

The main consideration started as wondering to fit the new small fuel tank without the risk of diesel fumes in the van from filling it up.  Decision made, gonna tap the main van fuel tank.
Easier said than done as it happens!  The van fuel tank does not hardly have any flat surfaces to fit a standpipe into.  Much reading and Googling I decided to tap the fuel tank right next to the fuel pump access as seen in the next couple of photos.  There was just enough flat area to tap and fit the standpipe without interfering with the workings of the fuel pump and sender unit float.


Stupidly I broke the locking ring on the pump / sender housing, but hopefully not enough for it to leak fuel.  Time will tell on that one!

Fuel tank tapped, now to run the fuel line to the heaters pump and to the heater itself.

Heater fuel pump

Fuel filter prior to the pump.

The instructions that came with the heater were vague to say the least, but good ole You Tube to the rescue with many videos on how to prime the fuel system and run the heater thankfully!

All in all, a good move and the new diesel heater is great!  


Well pleased with the end result and fitting.  The heater runs up beautifully and heats the van up to the preset temperature fairly quickly.  Long may it last.

Note worthy here is, we have fitted a Carbon Monoxide detector and smoke detector.


Sunday, October 8, 2017

Upgrading the Solar System

Not much here to report, except that we feel that 150 watts of solar panel is not quite enough to keep our twin leisure batteries topped up when running our fridge on gloomy days.

Hey ho, lets fit a second 160 Watt solar panel


Glued with Sikaflex 252 and screwed down on the roof same as the existing solar panel, dont want them coming off when travelling!
I cut the existing solar feed cables and fitted new MC4 connectors and a pair of Y connectors to couple both panels together.
We now have 310 Watts of solar energy at our disposal to keep the leisure batteries topped up.


Friday, September 8, 2017

Air Suspension Upgrade

So, as you build and increase the weight of the van, the inevitable occurs, the van sinks on its suspension.
Although we have been very weight conscious within our financial restraints, the elliptical leaf springs flattened out.
A bit of research found these after market Air Suspension kits highly recommended!


Fitment of the kit is fairly straight forward, first you have to remove the two suspension bump stops, this in my case was not the easiest thing to start with!  
One fo the fixing bolts was rusted and the captive nut welded into the chassis came loose and was rotating as I tried to undo the bump stop!
Oh well, lets cut it out then!


All in a day!  With the bump stops removed fitting the kit is a doddle!

Simply bolt on the upper plates then secure the two clamp bolts that grip onto the leaf spring seat.


The cat does insist on checking the work is carried out correctly!


All that remains is to decide the location of the air valve and air gauge, once decided, run the pipework do up the nuts and pump up the system to your desired air pressure and check for leaks.


The BIG question remaining is "What air pressure" to pump up the system to?
A bit more reading reveals so many people recommend so many different air pressures its pretty much a case of grabbing the mid range figure and see if it works for you!

We opted for 40psi for starters, to be honest it seems to work for me so its stayed at 40psi.
The air suspension kit certainly did the job, it raised the rear end of our van nearly 3 inches and in doing so, brought the leaf springs into a much more desirable elliptical shape.
The drive is improved too, it has cut down the wallowing on cornering nicely.

A good worthwhile upgrade at £250